Report templates provide the structure, layout, and content of the clinical reports generated in VarSome Clinical. Users can customize their reports based on the type of analysis (somatic or germline) using the Reports feature in the Toolbox.

Any VarSome Clinical user can create a Report template. Only the owner of the report template can edit or delete it later. Other users can only make a copy of the templates generated by other members of their group.
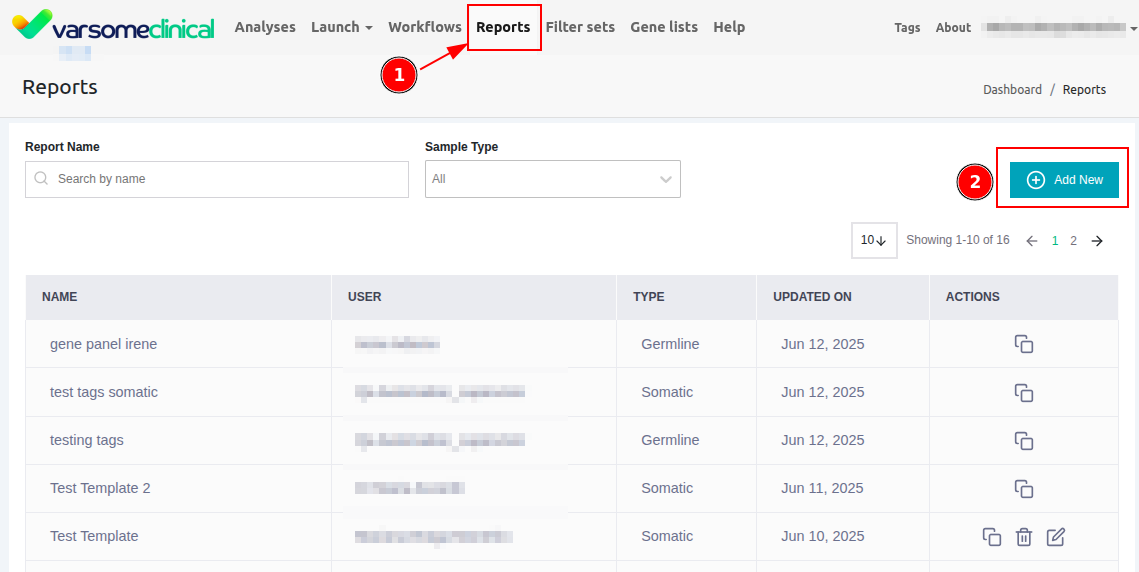
The logo, header, and footer can only be defined by the group supervisor under Preferences. The same header and footer are applied to all reports.
How to create a report template
To create a report template, go to “Reports > Add New”. A new pop-up will be displayed asking if users want to create a Germline or Somatic template.
Please note that germline reports can only be associated with germline samples, and somatic reports can only be associated with somatic samples.

In the Report Template, there are several fields where user can select the details required, depending on the requirements and sample type. More specifically, users can customize these fields to suit their reporting needs.
Report Template Details
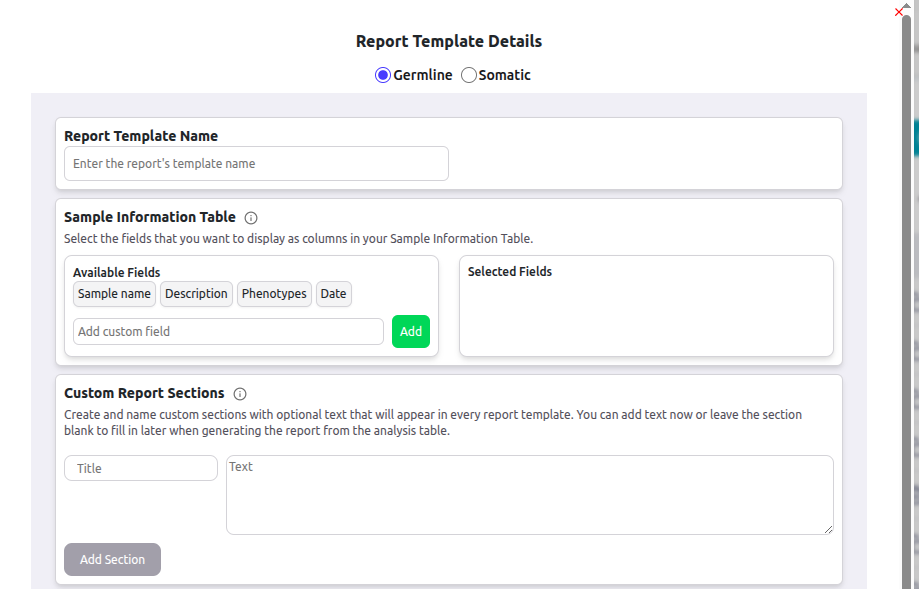
The report template contains the following customizable fields:
- Report Template Name: Type a unique name for the report template that will be used to identify the template.
- Sample Information Table: This section can display predefined fields such as Sample Name, Description, Phenotypes, and Date. For somatics reports, the available fields are Cancer Type, Age, and Sex. If these fields contain data, they will be automatically populationed when the report is generated. Users can also add custom fields. Each custom field creates a placeholder in the sample information table, which can be completed manually when generating a report. Up to 30 custom fields can be added.
- Custom Report Sections: Users can add up to 15 custom sections to the report template. Each section much include a title and may include text. Empty sections with a title are allowed. These sections are typically used to describe elements such as sample preparation and analysis methodology for each use case. Please note that all content must be provided when setting up the template.
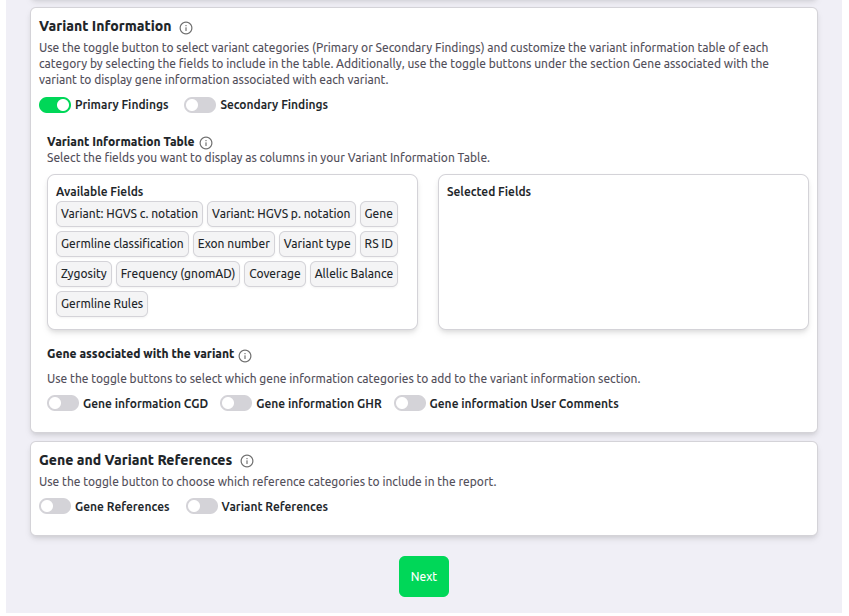
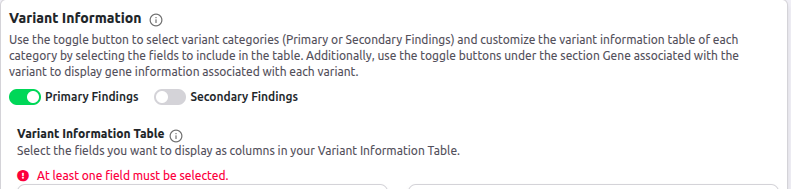
- Variant Information: Select the variant categories to include in the report: Primary Findings, Secondary Findings, or both. If both are selected, they will appear in separate sections. At least one category must be selected; otherwise, an error message will be shown when generating the report.
Users can customize the variant information table by moving fields between the Available and Selected field lists. Predefined fields include: Variant: HGVS c. notation, Variant: HGVS p.notation, Gene, Germline classification, Exon number, Variant type, RS ID, Zygosity, Frequency (gnomAD), Coverage, Allelic Balance, and Germline Rules.
For somatic reports, two additional fields, Somatic Tier and Somatic Rules, are available and can be selected instead of Zygosity.
It is also possible to add gene-level information associated with the variant. Please note if multiple variants are linked to the same gene, they will be grouped together, and the gene information will only be displayed once.
- Gene and Variant References: Users can choose to Include a list of scientific papers related to the selected variant, the gene associated with the selected variant, or both. If both are selected, the report will contain two separate sections: one for Gene References and one for Variant References, each listing the relevant scientific papers.
After clicking Next, a new pop-up window will appear for users to review the selected literature. In this window, users can drag and drop the fields to reorder them by clicking on the three-line symbol ![]() next to each field name. From here, users can either Submit the report template, making it available under the Reports tab as mentioned above, or select Previous to make further changes.
next to each field name. From here, users can either Submit the report template, making it available under the Reports tab as mentioned above, or select Previous to make further changes.

How to link a report template to a workflow?
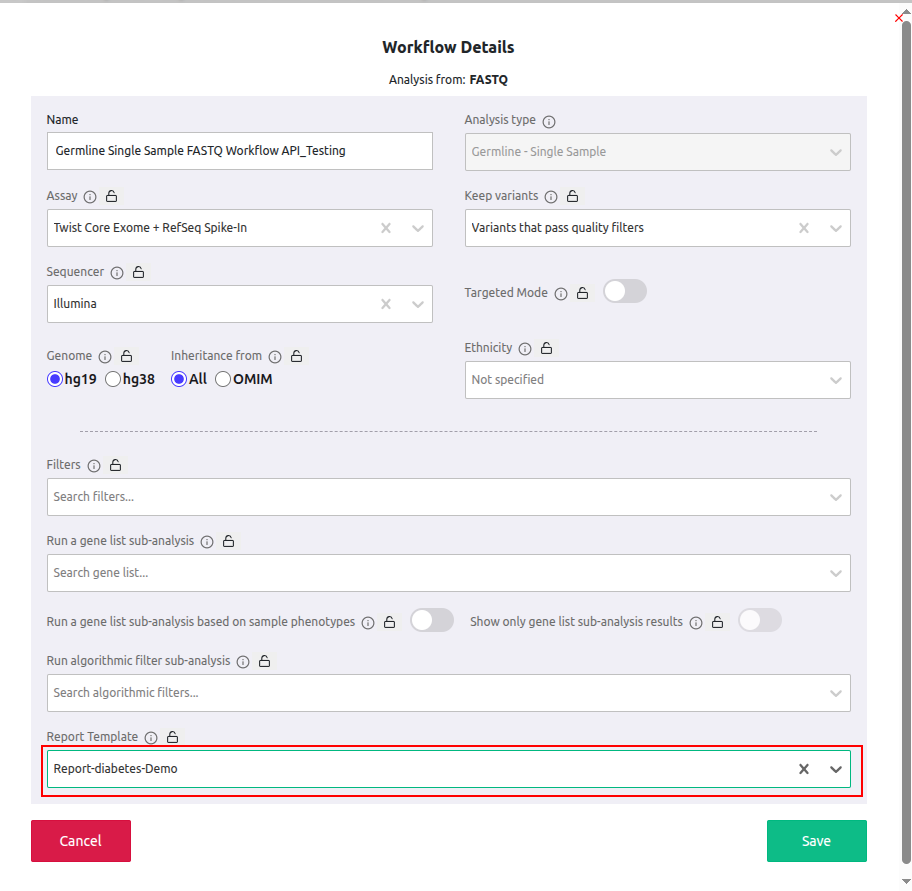
The group supervisor, or any other user with access to the workflow definition, can associate a report template with a workflow during its creation if they wish to have the report template automatically linked to each analysis run under that workflow. This can be done by selecting or entering the name of the desired template in the Report Template field, as shown in the image below. Finally, the Report Template field can be locked once the template is selected.
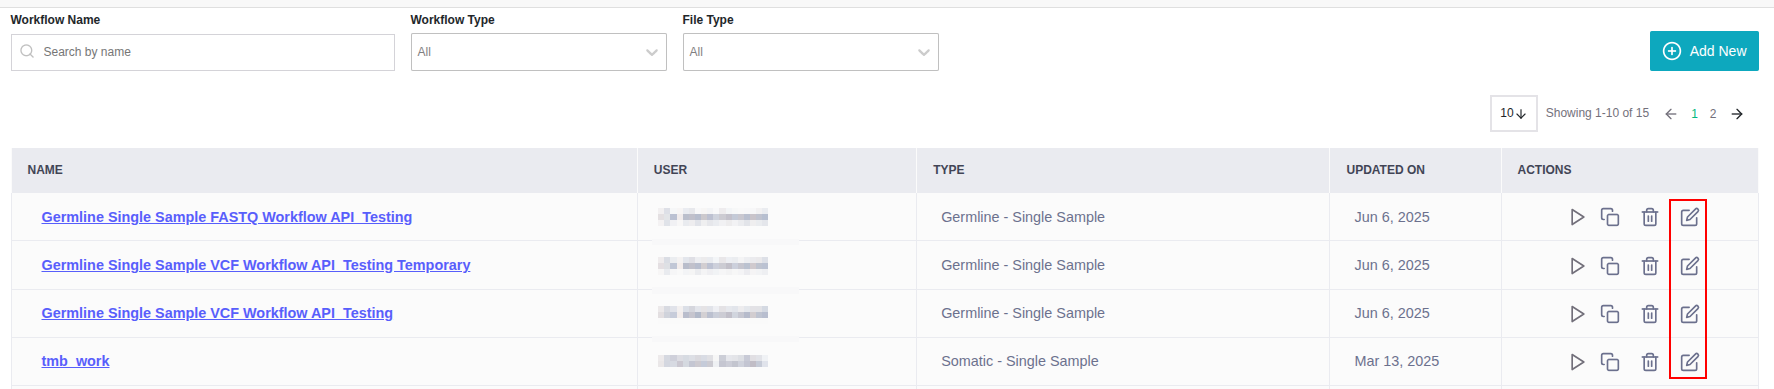
Please note that the users with relevant access can also add a report template to existing workflows by editing them, as shown below.
Launching an analysis
How to add a report template when launching an analysis?
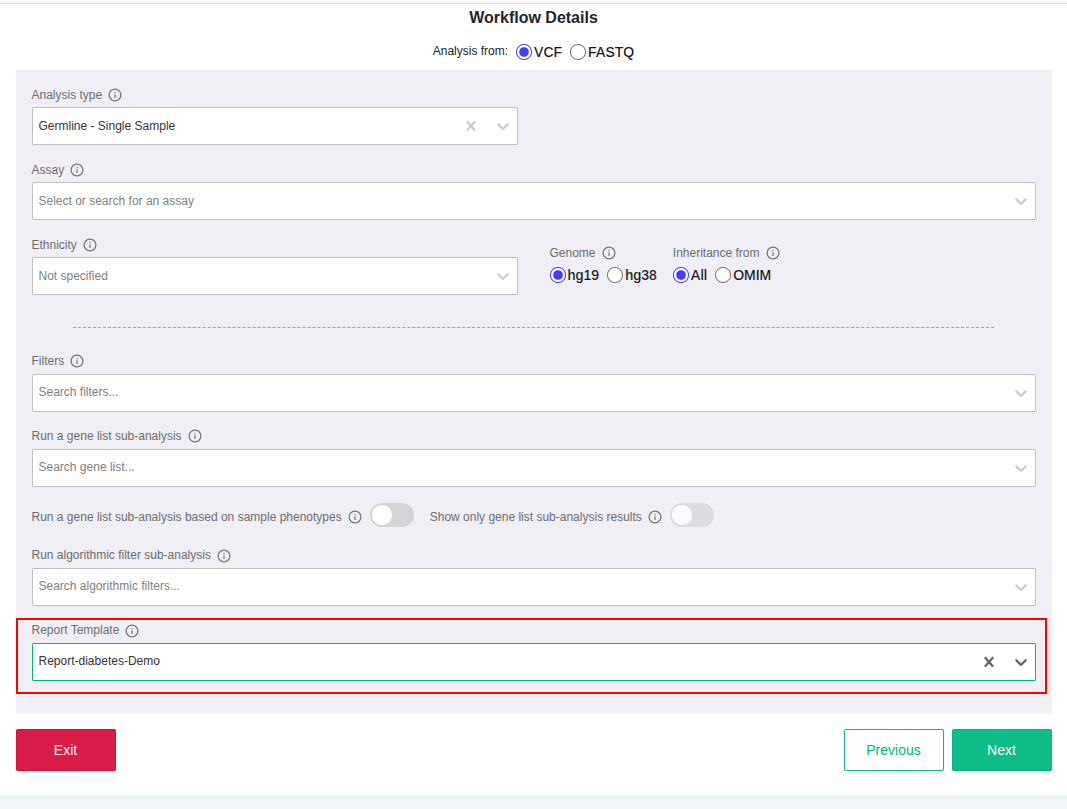
All users can associate a report template with an analysis they are about to launch. This can be done by selecting “Launch analysis without a workflow” and entering the name of the desired report template in the Report Template field when configuring the workflow details, as shown in the example below.

If no report template is selected at this step, a default template will be applied automatically. Users can still assign or modify the template later during the results review.
How to add/create a report template when reviewing the results
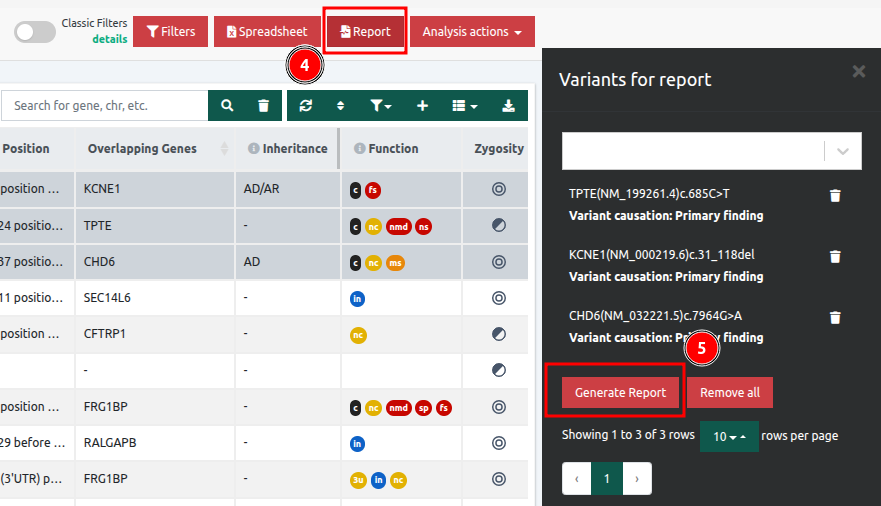
On the Variant Table page, users can either select one variant at a time by clicking on it or choose multiple variants at once (bulk selection) by holding Ctrl and clicking on each variant to be included.
Then, users can click on “Select variant(s) to export to a Report” ![]() and then “Primary finding” or “Secondary finding” according to the findings, for the variant to be included in the Report.
and then “Primary finding” or “Secondary finding” according to the findings, for the variant to be included in the Report.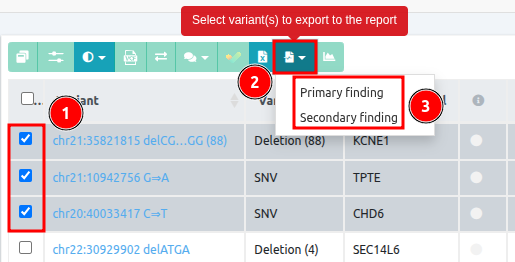
Next, users can either click the Generate Report button to create a report using the default template.
Or, specify a template by entering the name of the report template to generate one with the preferred fields.
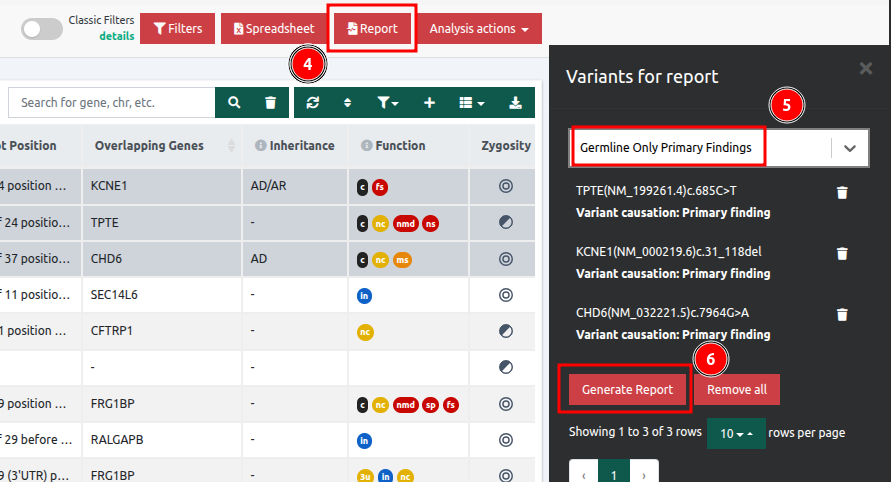
When the report is generated, it will contain the information for the selected variants using the fields previously specified in the template.
Once the report is generated, all fields can be edited, along with the text and background colors.
In each section table, there is the option to change the background color of a cell by right-clicking on it and then going to Cell >> Cell properties as shown below:
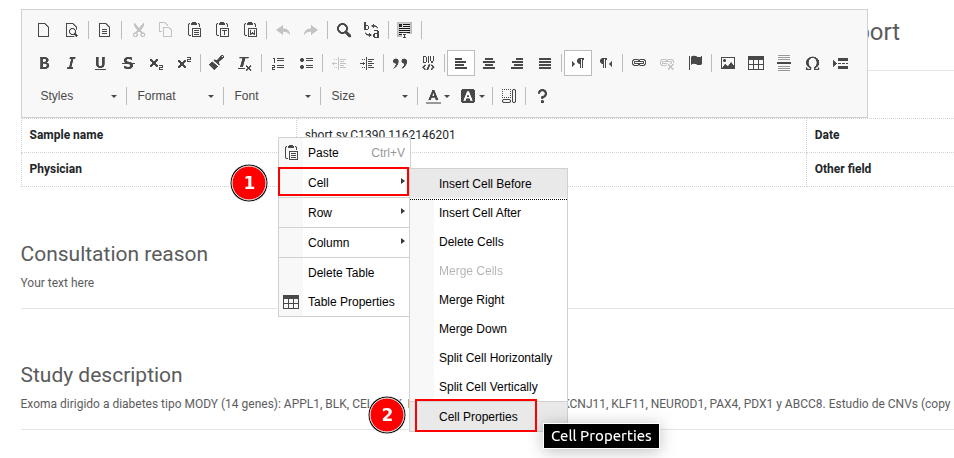
In the Cell properties menu, users can choose to change the background color, among other available styling options:

To add more information not initially defined in the template, users can click on the ![]() icon, and a Report widgets menu will appear, allowing users to drag and drop more information into the report as desired.
icon, and a Report widgets menu will appear, allowing users to drag and drop more information into the report as desired.